Comment effectuer un testeur de détection de liquide
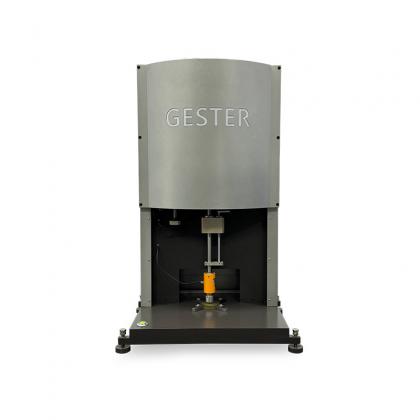
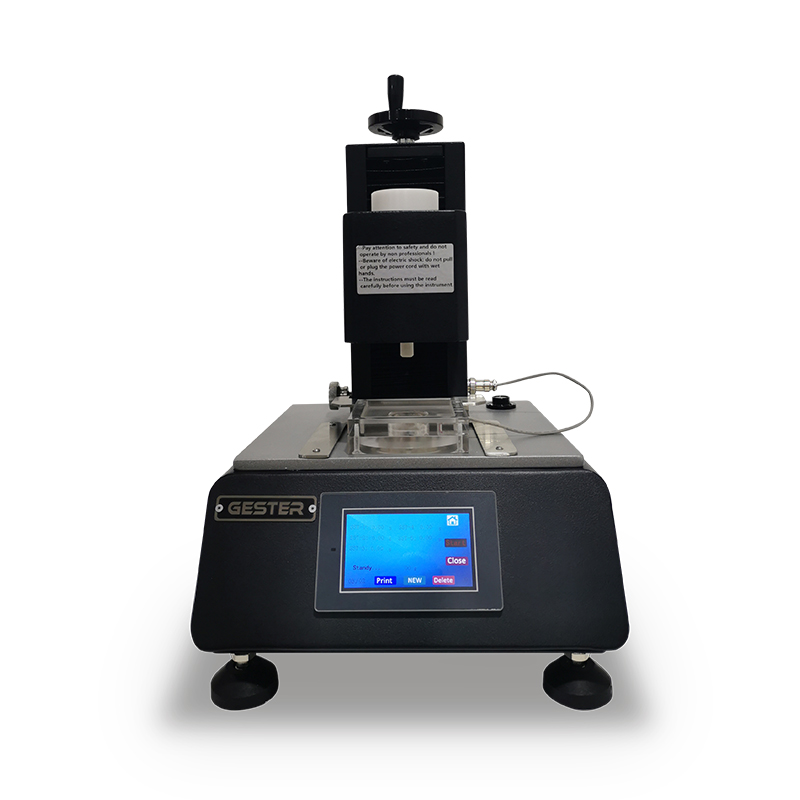
Ce Testeur de passage de liquides GT-CN04 mesure le temps de passage des liquides à travers des matériaux non tissés, couramment utilisés dans des produits tels que les couches, les serviettes hygiéniques et autres produits d'hygiène absorbants. Il détermine l'efficacité avec laquelle un liquide peut traverser une couche de tissu, ce qui est essentiel pour garantir la qualité et les performances du matériau.
Cet article vous guidera à travers les étapes essentielles pour faire fonctionner efficacement le GT-CN04, couvrant ses applications, ses fonctionnalités et un guide détaillé sur la façon d'effectuer le test.
Comprendre l'application
Le testeur de passage de liquide GT-CN04 est principalement utilisé pour évaluer le temps de passage du liquide des matériaux non tissés. Ce test simule l'absorption de fluides à travers les tissus, imitant des applications réelles telles que l'utilisation de couches ou de produits hygiéniques. Le temps de pénétration est la période nécessaire à un liquide pour pénétrer à la surface du tissu.
La machine est conforme aux normes internationales telles que ISO 9073-13, GB/T 24218.8 et plusieurs autres, garantissant l'exactitude et la répétabilité des résultats.
Caractéristiques du testeur de détection de liquide GT-CN04
Le testeur de détection de liquide est équipé de plusieurs fonctionnalités avancées conçues pour une utilisation facile et une précision des tests :
1. Contrôle par écran tactile couleur : cette fonctionnalité permet à l'opérateur de naviguer facilement parmi les options de test en chinois et en anglais, ce qui la rend conviviale pour un public mondial.
2. Imprimante thermique intégrée : après chaque test, les résultats sont imprimés instantanément pour une référence rapide.
3. Disque de pénétration en plexiglas : le disque de pénétration, fabriqué en plexiglas spécial, est résistant à la corrosion et durable, garantissant ainsi la longévité.
Accessibilité des données : tous les résultats de tests et données statistiques peuvent être stockés et accessibles à partir de la mémoire interne de la machine, fournissant ainsi un système d'enregistrement robuste.
4. Dispositif de positionnement : un dispositif de positionnement permet de garantir que le disque de pénétration est correctement aligné avec l'échantillon, réduisant ainsi les erreurs causées par un mauvais alignement.
Guide étape par étape pour réaliser le test
Plongeons-nous maintenant dans le processus de réalisation d'un test de pénétration de liquide à l'aide du testeur de pénétration de liquide. Ce guide couvrira tout, de la préparation de la machine à la visualisation et à l'impression des résultats des tests.
1. Préparation de l'échantillon
Chargez l'échantillon : commencez par placer la plaque de base sur la zone de test de la machine. Sur la plaque de base, empilez du papier absorbant (mesurant 125 mm x 125 mm) d'une épaisseur totale de 4,5 mm. Cette couche absorbante aidera à simuler les caractéristiques d’absorption des matériaux réels. Sur le papier absorbant, placez l’échantillon de test (également de taille 125 mm x 125 mm).
2. Connexion de la plaque de pénétration
Fixez la fiche aviation : Connectez la fiche aviation à la plaque de pénétration. Une fois connectée, placez la plaque de pénétration dans la fente au-dessus de l’échantillon, en vous assurant qu’elle est bien ajustée. Cette plaque appliquera une pression pendant le test et mesurera le temps de passage du liquide.
3. Réglage de la hauteur de l'entonnoir
Réglez la distance de l'entonnoir : faites pivoter la poignée située en haut de la machine pour régler la hauteur de l'entonnoir. La pointe de l'entonnoir doit être positionnée à 30 mm au-dessus de l'échantillon (équivalent à l'épaisseur de la plaque de pénétration). Cette distance garantit un débit de liquide constant pendant le test.
4. Alimenter la machine
Allumez l'interrupteur d'alimentation : après avoir terminé la configuration mécanique, allumez la machine. Vous serez accueilli par l'interface à écran tactile couleur où les paramètres de test peuvent être configurés.
5. Définition des paramètres de test
Réglez l'intervalle de temps : Il s'agit du temps entre chaque pénétration, allant de 20 à 99 secondes. La durée que vous choisissez dépend des exigences spécifiques du test.
Définir le nombre de pénétrations : Vous pouvez configurer la machine pour qu'elle effectue entre 1 et 5 cycles de pénétration. Cette fonctionnalité permet d'effectuer plusieurs tests sur le même échantillon, ce qui est particulièrement utile pour comprendre les performances du matériau au fil du temps sous une exposition répétée à un liquide.
6. Préparation de la solution
Ajoutez la solution de test : préparez une solution de test composée de 2 000 ml d'eau distillée et de 18 ± 0,01 g de NaCl. Assurez-vous que la solution a une tension superficielle de 70 ± 3 mN/m, ce qui est essentiel pour des résultats précis. Utilisez une pipette Minim pour mesurer exactement 5 ml de solution et ajoutez-la à l'entonnoir situé en haut de la machine.
7. Démarrage du test
Commencez le test : Une fois que vous avez défini tous les paramètres, appuyez sur le bouton "Entrée" pour commencer le test. La machine lancera le premier cycle de pénétration et le liquide commencera à s'écouler à travers l'échantillon.
8. Réalisation de plusieurs cycles de pénétration
Surveiller les intervalles : après la première pénétration, la machine compte à rebours le temps d'intervalle avant de lancer le cycle suivant. Pendant cet intervalle, ajoutez encore 5 ml de solution dans l’entonnoir. Répétez ce processus pour chaque cycle de pénétration supplémentaire (si configuré pour plusieurs cycles).
9. Terminer le test
Conclusion du test : Une fois le cycle final terminé, la machine s'arrêtera automatiquement. Vous pouvez afficher les résultats des tests sur l'écran tactile. Les résultats montreront les temps de barré pour chaque cycle.
10. Impression des résultats
Imprimer le rapport : après avoir terminé le test, cliquez sur le bouton "Imprimer" pour générer une copie papier des résultats du test à l'aide de l'imprimante thermique intégrée. Cela permet une documentation rapide et une comparaison avec d’autres résultats de tests.
En maîtrisant l'utilisation de ce testeur de détection de liquide, vous pouvez contribuer au développement de produits plus performants qui répondent aux besoins des utilisateurs finaux, garantissant confort, fiabilité et sécurité.


 français